How To Grow Sprouts In A Jar
Follow these step by step instructions for everything you need to know to easily and safely sprout your superfood seeds, peas and beans in a mason jar with a strainer lid. Its really is so simple and is by far the easiest method to grow delicious produce from the convenience of your own home. And it all takes less than a week!
This article covers the frequently asked question, "How do I grow organic sprouts using a mason jar".
There are a few different equipment options available to use as a drainage lid. Options include organic cheesecloth, hessian and cotton which can be secured around the mouth of the jar with a band however this tutorial will focus on our stainless steel sprouting lids as they offer the best drainage and most importantly, airflow.
The method remains the same regardless of which lid you use.


Both parts of the lid - the ring band and mesh insert are ultra hygienic and safe to immerse in boiling water, clean in the dishwasher, freeze and being plastic free means no toxins in your food or in the environment where the plastic type eventually wind up. We're an environmentally focussed company and even though the composition is 100% premium grade rust resistant 304 stainless steel which can be recycled at the end of its life...... it still came from the earth. Therefore we manufactured these lids to last you a life time of frequent use. We upgraded the diameter of the wire mesh without affecting drainage or airflow and beefed up the ring/screw piece, making this a superior product to others on the market. Our lids are stamped with our logo because we are proud of their quality.
GETTING STARTED!
Growing your own sprouts at home is fantastic for so many reasons. They're super nutritious, packed with enzymes, nutrients and all that vitality needed to get from seed to seedling, and are ready in only a few short days!!
You will need:
1. Good quality organic seeds for sprouting
2. Stainless steel sprouting lids
3. Wide mouth mason jars (86mm neck)
4. Access to a clean water source and area to drain.
5. Canning lids if you wish to store your sprouts the same jars.

The method used to sprout seeds in a jar is so simple that any black thumb can follow. There's only a couple of steps - soak - rinse - drain - repeat and only takes a couple of days until your harvesting your own home grown produce!
I mean really the nuts and bolts of this method are to soak your seeds overnight in the jar filled with water, pour out the water, fill the jar again then immediately pour it out and repeat this until you have sprouts. We will go over these steps a little more in depth later but in the meantime I want to delve into the not so talked about tricks and factors responsible for great success growing sprouts safely.
Success lies in the getting started stage. That is, choosing the right equipment, the correct seeds and taking the right precautions and cleanliness from start to finish!
Get yourself some good organic seeds for sprouting
The key words here are "organic seeds for sprouting" and your choice of seeds here will be the ultimate factor in your success or fail. There is a very real reason you should ensure you purchase specifically organic sprouting seeds. They are in a completely different class from other vegetable seeds, grains or pulses available from gardening websites and supermarkets we've written an in depth article here about this but briefly in the meantime this is why.
They are untreated with poisons. (pesticides, fungicides, fertilisers. Do you really want to be consuming these things? Its not such an issue if your consuming a mature vegetable such as a tomato (unless your a soil born microbe of course!) however you'll get the full dose if you eat the seed as a sprout. No thanks!
Our sprouting seeds have been independently lab tested for dangerous pathogens such as listeria, salmonella and e-coli. This is a massively important factor here as you can be assured that if you have sterilised your equipment and washed your hands prior handling each time you can be confident of a safe product!!
Our sprouting seeds have been graded for purity, and germination. If you get poor germination when sprouting the undeveloped seeds can go bad, they rot. Once these stragglers go bad they can turn the whole batch. Also we want a jar full of delicious sprouts.... without sifting through all the hard crunchy inedible seeds!
Sprouting seeds in jar relies on two main factors. Good seeds as we've discussed, and good airflow and drainage.
Aim to use the largest size mesh you can get away with without your sprouting seeds falling through the holes.
Basically use the fine mesh for your alfalfas, brassicas and other small seeds up to say the size of a radish, and the larger mesh for any thing larger than a radish - beans peas etc.
What this does is ensures your sprouts receive the maximum amount of air exchange and drainage possible.
We go for wide mouth jars (86mm) over the smaller neck jars for the same reason. The larger surface area boosts aeration, drainage and also importantly makes it easier to retrieving our sprouts once they've grows and are ready!
We use stainless steel as we're not environmental vandals and prefer not to have BPAs and other unknown compounds leach into our food.
The 304 grade steel is incredibly rust resistant and should any rust appear simply polish it out with a toothbrush toothpaste.
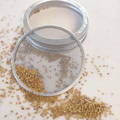
Organic Alfalfa Seeds with a Fine Mesh Lid
Use Quality Equipment
As an eco company who believes in the positives that growing our own can achieve for ourselves, our societies and environment, we really want you to succeed at growing your own.
Part of that involves not selling you badly designed or poor quality equipment. Or equipment which is just plain unnecessary or prone to failure.
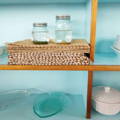
People enquire as to why we don't retail stands, or lids with in built stands...
We've trialled the equipment on the right and cant recommend these styles. there is zero airflow with the blue lid whist the stands on the right sit in the drip water and rust quickly.
Save your money and use a bowl or a dish rack as a stand instead!
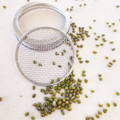
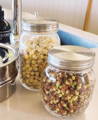
Larger Mung Beans with a Large Mesh Lid
Insufficient airflow
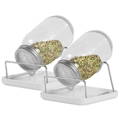
Poorly designed stand
Mesh size is dependent on seed size
Fresh water, facilities and storage
The main tasks involved in sprouting your own seeds are basically filling your jar with water and tipping it out two to three times a day.
For this you need access to good quality clean water. Tap water is fine in most countries including the UK, and a sink or somewhere to dispose of said water.
The really great thing about using the jar method is that it is so self contained. By using canning lids as well you can even store your produce in the very same jars for up to a week in the refrigerator. But more on harvesting and storage later.
Step by Step Instructions For Using Your Jar Sprouter
Take your jar and lids and put them through a cycle in the dishwasher or wash them with a soft sponge in hot water with an eco detergent to clean and sterilise everything before you get going. Also wash your hands and any other equipment you will be using to measure out your seeds.
Step 2 . Measure out your seeds and Soak
Sprouts are small but mighty! It is important not to over estimate the quantity of seeds that is required to fill your jar.
One to two tablespoons of the varieties with a smaller seed size should be more than enough to give you a nice full 1L mason jar of sprouts! And a quarter cup for the larger ones should see you in good stead.
The smaller sized varieties are your alfalfas, broccoli and brassicas including kale and cabbage up to the size of a radish or fenugreek seed. The larger varieties are your adzukis, mungs and peas.
Regardless try to avoid exceeding filling the jar more than a quarter way. Doing so could restrict airflow and drainage once your seeds sprout which can lead to problems with rot and spoilage.
Add your seeds to the now clean jar and fill the jar with room temperature water, agitate the seeds a little then empty the water. This step just makes sure the seeds are nice and clean!
Refill the jar and leave it somewhere out of direct sunlight to soak.
As a general rule smaller seeds such as alfalfa or broccoli can be soaked for as little at four hours where its best to soak the larger beans and peas overnight.
That said, in this example we have organic alfalfa and organic mung beans on the go and to keep it simple they're both soaking overnight. Don't get bogged down on the technicalities - sprouting seeds is easy!
.

Clean equipment and measure your seeds
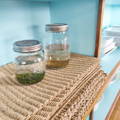
Soak overnight out of direct sunlight
Step 3. Rinse and Drain
This step is as easy as it sounds and makes up the bulk of the process......
Simply tip the soak water into the sink, a houseplant or wherever and refill. No need to remove the lid!
You can repeat this once or five times, it really doesn't matter.
Once you've disposed of the soak water, fill the jar up again swirling the jar around to rinse the seeds then again drain the water away. Try to avoid using very hot or very cold water (room temperature is best) as this can shock your seeds and may result in poor or uneven germination.
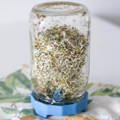
Place your jars in a bowl, your dish rack or in any way so that any extra water can drip out whilst leaving enough of the mesh clear so as to allow a good amount of that all important airflow.
Repeat this process two to three times daily until you sprouts are ready to eat. Once when you wake up, once before bed and throw in an optional rinse at some convenient time between. The entire process only takes a few mins!

Rinse and swish

Drain
Leave to drip
How do you know when to harvest your sprouts?
One of the most common questions regarding sprouting that beginners make is "when can I harvest and eat my sprouts?". There is no hard and fast rule for this which leads to some confusion and uncertainty.
Sprouts are the immature seedlings of young plants and can be enjoyed at all different stages of development. Furthermore some varieties such as bean and wheat sprouts (wheatgrass, adzuki and mung beans) can be ready to eat in as little as two days whilst some varieties are ready in up to seven.
Generally sprouts are ready to eat between two and six days old with tails between 1.3cm to 5cm (1/2 - 2") long. We find it best to taste test your crop throughout the grow to see when you like them best. In general the earlier you harvest the milder the taste with the flavour intensifying as the sprouts mature. Find the sweet spot for your tastes and preferences!
How to harvest and prepare your sprouts for eating
Once you cant wait any longer and want to start enjoying your home grown superfoods give them a final rinse drain cycle and get the following equipment ready by washing thoroughly with hot soapy water:
You Will Need:
A Large Bowl
A Colander or sieve or salad spinner
Fresh Water
A Sink, Basin or suitable area to pour water
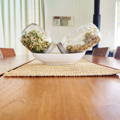
Free your sprouts from the jar (this is why we use wide mouth jars) and place in a large bowl filled with water. Swish your sprouts around with your (clean and washed) hands then push them to the bottom allowing the seed hulls to rise to the surface. The hulls are edible and some people like the texture however if you prefer you can now tip the bowl over the sink and pour out the water, hulls and all.
Place your sprouts into the colander, sieve or spinner and shake/spin out as much water as possible, it helps if using a colander to do this at a 45 degree angle over the sink, for some reason we just get more drips this way!
Transfer to some paper towel and pat dry. Its important to get your sprouts as dry as possible before you store them however we recommend avoid air drying your sprouts in strong direct sunlight as they could dry out!
"Greening up" is a term used to describe the process of boosting the nutritional punch packed by sprouts such as alfalfa, broccoli and other leafy green vegetable varieties. Its not practiced with the beans, peas and grains and involves leaving your harvested sprouts in indirect sunlight for a few hours. This causes them to produce chlorophyll and thus their colour "greens up" a little.
How to store your sprouts
Storing your freshly grown sprouts is easy and they can safely be stored for a week in the refrigerator provided you store them correctly.
The running theme in this tutorial, you may have noticed, is hygiene and moisture management. The same stands for the safe storage of your sprouts..
What you will need:
Air-tight jars or some other airtight container
Paper towel
If you are using our canning lids and jars both can be placed in the dishwasher or immersed in boiling water. A hot soapy wash will also sterilise your equipment.
After cleaning your hands and equipment dry your jars and lids completely before introducing your (now dried) sprouts.
You can add a small dry paper towel to your container to absorb any unwanted moisture still present. Screw the lid down and place in the refrigerator.